Sunday, September 19, 2010

Some late night inspiration

I had to escape the main living area last night due to a 10 year old sleepover, so I headed to the basement to create! I wasn't sure what would come from the adventure but it ended up being a great night. I am surprise you didn't hear me giggling where ever you were! And since it was into this morning before I went to bed - I am bushed today!!

So - here we go!!!! I was surfing the web last week when I stumbled across this website - here - and fell in love. I have never been an owl person till Stampin' Up came out with their owl punch and it has spiraled out of control!!! I fell in love with this idea and had to purchase the template and directions!


Last night I made the Mr. & Mrs. Claus box with the little cards! Mr. Claus is on one side and Mrs. Claus is in the other side!!! Isn't it ADORABLE!!! It came together so easy! Her directions are awesome! (Of course, it would have been a little easier if I had paid attention when I stapled the pages together and put them in order!!) I did mis-understand one section of the directions and thought 
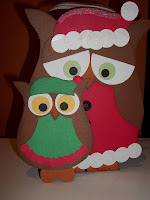
I was making 2 boxes when I did not know I was putting Mr. on one side and Mrs. on the other so I ended up with the fixings for another box.


And - of course - it wouldn't be complete without making the little elf cards to go inside the box!! I almost think the elves are the cutest part. I did add some bling with some dazzling diamonds glitter to the hats and clothes.

With the "extra" box parts I had leftover - I decided to make a little girl owl! Today I found out that Lynn has extra owl patterns on her website so I have ordered those!!! I cannot wait to make the other owls and share them with you!!!

I really hope you have enjoyed today's post! I will be "tweekiing" these to sell at my fall craft fairs! If you can think of a design you would like to see - please let me know! And as always - drop me a note and let me know what you think! Thanks for popping in!!!

Tuesday, September 14, 2010

The Big "10"

Happy Tuesday my blogging friends!!! Today is my baby's 10th birthday! I cannot believe that 10 years ago today, I held her for the first time! Time has flown by. I will post some pics later this week from her birthday!!!

Today I have a couple of pictures to share. We spent the weekend at the Firemen's Convention and had a blast! My favorite part, besides seeing my hubby in his dress blues, was the muster. I have never seen one before but am already looking forward to seeing the next one!

This pic is of the hubby in his dress blues....


These are of Rob taking part in the mystery event at the muster. (he had to ride a bike with almost flat tires and a broken seat down a strip to pick up pieces of the chief's turnout gear)

And the last one is of the 3 guys who went to the convention representing Canton Fire Dept, standing in front of the new fire truck that they WANT! This is one nice truck!

Stay tuned - I will be back later this week with something new to share! Tonight is filled with cake and ice cream!!

Thanks for popping in!

Saturday, September 11, 2010

Tea for Two!

Good morning blogging world!! Things are still alive and well at the Walker household! We are currently in Presque Isle, in northern Maine, attending the Fireman's Convention. It is cool enough that I could actually dig out my much loved turtlenecks!!!! I am so happy!

Today I wanted to share a quick project that is still in the "maybe" stage. This is a little tea bag box, with a slide out drawer to hold the teabag.

It has it's own card attached to the top so an additional card is not needed. (And it won't get lost along the way!) This one is made from a simple piece of light green card stock and I stamped the tea cup on the top with a new clear acrylic stamp set featuring several coffee cups, sayings, etc. I matted the image onto a pale yellow and attached it to the card front. The small drawer slides into the holder and makes the set complete.


Inside the card I stamped "you're tea-riffic" from the same stamp set.

Like I mentioned earlier - this is in a "maybe" stage so please drop me a note and let me know what YOU think!

As we spend today, 9/11, please take a moment or two to remember all those lost in the 9/11 tragedy, as well as all the service men and women, law enforcement, and fire fighters who risk their lives each day to keep us safe. We live in the land of the free BECAUSE of the brave. God Bless America!


Thanks for popping in today!

Monday, September 6, 2010

Happy Labor Day!

Happy Labor Day! I hope this is a day that you DO NOT have to work! I happen to be a very lucky gal and I have the entire week off!!

Today I want to share a couple of cute boxes I made for a friend! I tried several different styles but nothing really "worked" for me. I think these came together nicely!

I found the directions for these on SplitCoast Stampers website. These both use an 8 1/2 x 11 sheet of card stock. After scoring according to the directions, I stamped the background design with the Priceless stamp set from Stampin' Up. (Thanks to Katie for loaning me this set. I really need to get it for myself. I keep putting it off for some reason! Guess I just need to buck up and order it!) :)

After stamping the background - I assembled it into the box. I love how the top side edges fold down into the box to add more stability. No waste here!!! I rounded the corners of the tops and punched the circle for the handles. I used some scrap brown card stock and punched a circle and then a scallop circle to add to the handles. I used my crop-a-dile to make the holes for the ribbons.


I stamped the swirly onto some white card stock and added the pretty heart near the top. This was matted onto some brown card stock and adhered to the front of the box. I stamped another heart and cut it out free hand. I added it on top of the first heart with dimensionals. Near the top - I stamped the butterfly from the same set and cut it into a tag shape and matted it with the same brown card stock. I searched through my many, many flowers and found some that matched the paper I chose! Coordinate those with another flower, add a brad, and adhere with another dimensional and - poof - complete!!!
I hope you have enjoyed today's post! I will be working on a Christmas version of these this week! Thanks for popping in!

Friday, September 3, 2010

TGIF!!!!!!!!

Happy Friday all! Not sure about where you are but here in Maine it is HOT HOT HOT! So hot in fact that schools are closing due to the extreme heat. I never thought I would see school cancelled for a non snow storm. My kiddo - however - is still in school and probably hating every minute of this heat.


Today I would like to share another project I found for craft fairs. These are going to be great teacher's gifts! I like to try out a project before I sit down and make a bunch, just in case the directions are hinky or I have to alter something, or it - in some cases - comes out really ugly!!! This was my trial one but I love it and will probably sell it along with the others!!

I made the base with a bright green (Christmas-y bright - not neon bright!!) card stock and used some scrap patterned paper (just for you Rach!) from Basic Grey. I just love this paper and wish I had more! I matted the patterned paper onto a mustard-y yellow card stock. As I sat and wondered what to put on the front - I thought about upcoming events and I HAD to think of Christmas. I know with heat like we are having - Christmas seems so far away but I want to get a jump start on it and by making these - helping others get a head start.


What says school/teacher like this adorable owl? I never thought I would fall into the "owl" fad but I just love this guy! You can do so much with him. Some day I will take a day and show you the many, many things he can make!! I added 3 colorful buttons for dimension and tucked in a pen. I also stamped ABC's and 1,2,3's on the small white mat in red.

Here is the inside:


What do you think? I think teachers are going to love these! And grandmothers, aunts, friends, everyone!!!

Thanks for popping in today! Stay cool!

Thursday, September 2, 2010

A unique gift holder

Good morning again! Today I wanted to share a project I found on this website while I was surfing! She had some amazing ideas. I just knew I had to give this one a try!


The first one is made with some designer paper from Stampin' Up from last Christmas. I used plain paper (also from Stampin' Up) as the base for my holder. I do not have the top note die from Sizzix (because it is a Bigz die and will not fit in my machine) but I had one that I traced and used on the front. I also traced the scalloped envelope die and made 2 small envelopes for the inside to hold a gift card (vertically) and a note or money, or whatever you choose. I covered the scallop flap with the patterned paper to add some color to the right side.

On the left - I stamped coffee beans and a coffee cup. I decided to use a white piece of paper on the left side and punched the side with the spiral punch from... you guessed it... Stampin' Up!
I cut a small slip in the cover and ran ribbon all the way around to tie it closed. I stamped a coffee carafe on the front and it is ready to go!


The second one is made almost identical except I changed up the colors and theme. This time I wanted something a little more Christmas-y. I used more paper from the Christmas line of DSP and used a pretty red for the base. Once again I added some patterned paper to the flaps of the envelopes for color. On the front of this one - I kept it fairly plain, just adding some different patterned paper and stamping a tree on white card stock. I added a small piece of ribbon just on the front. I hope you have enjoyed today's post! See you again tomorrow! Thanks for popping in!

Wednesday, September 1, 2010

Happy Hot Humpday!

Good morning yet again! It is going to be another HOT one here in Maine today! So glad I am working in cool AC today!

Today I wanted to share with you a simple project and some variations of it that I came up with!
The first picture is a treat holder that I learned to make at a Stampin' Up party that Kelly did! She has some awesome ideas and her work is phenomenal. This one was stamped with a new Halloween set from Stampin' Up and uses the new Halloween paper as well. We used a few punches as well; like the circle, scallop circle, scallop border and the new (and spooky) bat punch! After I stamped the witch's feet- I stamped them again onto scrap paper and cut out the boots and placed them on the card (over the feet) with dimensional to add some depth! We punched 2 holes and tied black ribbon through them to hold it shut! (I took off the ribbon to measure the paper!).

The next ones are variations that I came up with all on my own (except for the last one!) This project is so simple to make for any holiday or reason!

The first variation is for Thanksgiving. Leave this on a co-worker's or teacher's desk or give it to a secret pal with some yummy chocolates in it! What else says "giving thanks" like chocolate??!!

I stamped the cornucopia and round border with a Just Rite Stamp set and the leaves are from my misc stamp drawer! Thought it tied in with fall quite nice!


These two are also for Halloween. I used pumpkin stamp from Just Rite Stamps and colored it in with watercolor pencils. The sentiment is from my ever growing supply of $1 clear stamps from Michael's! The other Halloween one is also using scrap paper and as I dug thru a drawer that had misc stamps in it - I found this adorable mummy stamp! Not positive but I believe it was also in a $1 bin at Mike's.

Now- before I share my absolute favorite one- I will share the directions for making these! Believe me - they are soooo easy! Here we go:

Take a piece of plain card stock measuring 12 x 4 inches. Score it at 4 1/4 inches, 4 1/2, 5 1/4, and 9 3/4 inches. Crease all score lines. Make the center score line go up into the holder and the other 2 are like "legs". The patterned paper measures 4" wide and however large you want it. I think I made mine 2". Add whatever embellishments you choose to coordinate with your theme. You can either punch 2 small holes through the front flap and back paper or add a half a velcro dot under the flap to keep it shut. Inside take a small cello bag, cut it to fit and adhere with sticky strip, leaving enough on top to fold down and tape shut. That is IT! Easy peezy!!!

And without further ado - my favorite variation of this cute treat bag............
Isn't he absolutely adorable???????????!!!!! I was searching on Splitcoast Stampers for craft fair ideas and I saw a candy wrapper someone had made to look like a mummy. All I did was make the bag the same as above in white card stock and then tore more white paper into strips and inked them with chocolate chip ink. I layered then on and added eyes peeking out from between the layers and voila! My Mummy!!! i just love him!
Well, that is it for today!!! Thanks for popping in! Stay cool!