Thursday, May 5, 2011
hang in there!
Hi there blogger friends! Please hang in there with me - the last month has been super crazy and I haven't had a chance to create - much less post!! I promise I will be back on here soon! Thanks! ~K :)
Wednesday, April 13, 2011
cards cards and more cards!!
Happy Hump day blogging world!!! We are on the downhill slide to the weekend!!! That is always cause for celebration in MY world!!!
Today, as promised, are a few of the cards I made at the crop I attended a few weeks ago! It has been so crazy I haven't even had a minute to take pictures of them, much less post about them!! So - here they are!!!


I surfed several sites for ideas for cards! Most of these ideas came from Splitcoast Stampers (here). They have some wonderful creations over there! Be sure to check them out!!


Some are birthday cards and others are just plain and simple cards for everyday use!!


I love the simplicity and elegance of this country set!! The colors do not show up well at all but I chose reds and browns for the rooster, and a light grey for the jars and a light purple for the flowers. You will just have to believe me!!
Well, I will share more another time!! Happy scrapping friends and thanks for popping in!
Tuesday, April 12, 2011
Happy Birthday to you!
Happy Tuesday blogger friends!!! I think Spring has finally sprung here in Maine! It is absolutely beautiful here! I hope it is where you are too!
Today I want to share the birthday card I made for my hunny, whose birthday was yesterday!!!

Once again I used my big shot machine to make the embossed background. I got this awesome embossing folder at AC Moore and after I ran it through the machine, I sanded the top to highlight the words. I punched the corners with the Stampin' Up ticket punch and adhered it to the card! I used some dark blue and white card stock to make the mats and then stamped the large cupcake (from Stampin' Up's crazy for cupcake set) onto white and hand cut it out! I colored it with watercolor pencils and used dimensionals to add it to the mat!

Inside (which I rarely ever do) is simply matted with the same dark blue and white and stamped in black ink. I colored the Happy with a blue watercolor pencil and voila!!
Plain and simple - easy peasy!!!
Thanks for popping in today! Tomorrow I will show you some of the cards I made at the crop I attended a few weeks ago!
Wednesday, March 30, 2011
No joke....
Happy Wednesday all! I cannot believe it is the end of March already. Time sure does fly by. And in case you hadn't heard - Friday is April Fool's Day (and my friend Rachel's birthday), and a large scale storm is headed our way here in Maine. 6-12 inches of snow. Apparently no one told Mother Nature that spring officially started over a week ago! NO MORE SNOW PLEASE!!
So - today I will make you think happy thoughts with this colorful birthday gift card holder.
I will get the deminsions for you and post them soon. But in the meantime, take a peek:

I made the base of the card using red card stock and made a mat using black card stock, which really made the colors pop on this card! And I love how it uses circles everywhere. I punched the circles using various circle punches and cut off the edges of some, if needed. Above the sentiment, I cut a small piece of orange card stock and adhered 3 circles to the back and wrapped some ribbon around the base. I also took a small piece of ribbon and tied a bow (and adhered it with a pop dot.)
The inside of the card is where you make the fold for the gift card.

I punched the slot with the word window punch (I had to punch, slide over and punch again). I place a small piece of black as a mat here in the inside too to accent the circles here! Before I adhered the fold up, I cut a small piece of yellow card stock in where the fold would be to add some extra color behind the punched area. I added some sticky strip to the side edges and adhered!
To the top section I added a white mat and another small orange circle with a "for you" sentiment. 
I hope you have enjoyed this updated version of a gift card holder. (perhaps the next time I make it - I will use the new embossed techinque that is all the rave, and emboss all the circles onto the black mat and then embellish it! Who knows!!)
Thanks for popping in today!
Friday, March 18, 2011
It's Friday.... It's Friday...
I am so excited that it is Friday! This week has flown by for me. I hope it has for you. I cannot believe how fast time is disappearing already this year. I hate it... slow down!!!
I have Spring Fever.... might have to have a fever day soon! What do you do on your Spring fever days?
Today I want to share another birthday card... I am loving this stamp set and coordinating punch for the cupcake from Stampin' Up! There is sooo much you can do with it!
I like bright colors for birthday cards. It makes them a little more easier to use for boys/men!

On this card I used some scrap striped paper and coordinating plain card stock. I used the cupcake punch to make the cupcake and stamped the jimmies on it. I punched the candles from a coordinating color and yellow for the flames! I ran some blue ribbon around the center and tied some red to accent it! In the lower right I stamped the Happy Birthday sentiment from the punch bunch set (that I got for FREE thru sale-a-bration) and punched it out with the scallop square punch.
To top it off - I added 2 red brads to the upper right and adhered it all to the card!!!
I usually leave the insides if my cards blank so whoever uses it can write exactly what they want. (what do you do?)
I hope you have enjoyed this card! Tomorrow I am attending the Canton Cruisers Relay for Life Crop for a Cure event! 12 hours of scrapping fun!! I will be back to share some of the cards I will be working on!
Thanks for popping in!
Wednesday, February 23, 2011
To you from me.... with love
Happy Wednesday to you! We are officially on the downhill slide of the week. Kiddos, vacation is almost half over, make the most of it!!! Get outside and PLAY!!! Teachers, rest up and have fun!
Today I want to share another birthday card with you! This one is definitely geared towards girls! (The pink is a dead give-away!) :)

I make almost all my cards using a white card stock base. (I really like the white card stock that you can get at Walmart.) So on this card, I mounted pink paper to the white and then added an additional mat of baby blue. I also topped the blue paper with another layer of white but I ran it through the Big Shot using the swiss dots embossing folder to add some texture.
I stamped and punched the cupcake out with the Create a Cupcake set, from the Stampin' Up occasions mini catalog. I also punched a blue scallop circle (the large one), to set the cupcake on. I popped up the cupcake design with dimensionals and added a cherry to the top! I should have added some glitter to the cherry to give it some bling! I placed the scallop circle and the cupcake on a small piece of pink card stock and tied a ribbon around the opposite end. Adhering this piece to the right hand side of the inner mat, after I placed a pink brad above the birthday greeting, finished off the card.
All you would need to do is change up the colors and this card could be for a boy, or even an adult! I hope this inspires you to grab your stuff and get making some cards for all the birthdays you have coming up this year!
Stop by tomorrow for yet another card! Thanks for popping in!
Today I want to share another birthday card with you! This one is definitely geared towards girls! (The pink is a dead give-away!) :)
I make almost all my cards using a white card stock base. (I really like the white card stock that you can get at Walmart.) So on this card, I mounted pink paper to the white and then added an additional mat of baby blue. I also topped the blue paper with another layer of white but I ran it through the Big Shot using the swiss dots embossing folder to add some texture.
I stamped and punched the cupcake out with the Create a Cupcake set, from the Stampin' Up occasions mini catalog. I also punched a blue scallop circle (the large one), to set the cupcake on. I popped up the cupcake design with dimensionals and added a cherry to the top! I should have added some glitter to the cherry to give it some bling! I placed the scallop circle and the cupcake on a small piece of pink card stock and tied a ribbon around the opposite end. Adhering this piece to the right hand side of the inner mat, after I placed a pink brad above the birthday greeting, finished off the card.
All you would need to do is change up the colors and this card could be for a boy, or even an adult! I hope this inspires you to grab your stuff and get making some cards for all the birthdays you have coming up this year!
Stop by tomorrow for yet another card! Thanks for popping in!
Tuesday, February 22, 2011
Happy Happy Birthday
I had so much fun making birthday cards this weekend!! I follow a blog hop that happens on the 20th of every month. These ladies are fantastic creators and come up with some great ideas! Most of the cards I made are copies of what they posted!! :)
This card is made using the Create a Cupcake stamp set and matching punch from Stampin' Up! I knew the first time I saw this set that I had to have it! Everyone has birthdays and you can use this set for so many occasions besides birthdays!!!

The top is a muted red card stock and the bottom is some scrap polka dot paper I had in my stash. Between the 2 layers I added some white card stock punched with the scallop border punch. I used a brown mat with plain white card stock for the middle. I stamped the cupcake designs with bashful blue and chocolate chip onto scrap white card stock and punched them out with the punch. I punched the cherry out of red card stock and popped it on the top with a dimensional. I mixed and matched the tops and bases of the cupcakes. I added the sprinkles and the bow on the cupcake, using the stamps from the set.
I ran some brown and gold ribbon around the mat before I adhered it to the card.
To finish it off - I stamped the Happy Birthday greeting from the stamp set to the front of the card! Presto Chango! Done!
Thanks for popping in today. Be sure to check back tomorrow for another birthday card!
Sunday, February 20, 2011
Here comes the bride....
While I was surfing the internet looking for wedding invitations and cards.... I came across these and fell in love!
I had purchased the directions to make Lynn's owl box and card set (here) and when I saw these - I knew that they would be perfect for a little gift bag or something for the bride and groom!

I traced the small owl template and cut them out of brown card stock. I cut the "tux" out of black card stock. I cut a slit to make the lapels (folding them back) and added a white piece behind it to make the shirt. I added some black adhesive dots to make the buttons and a small white flower to the lapel. I added feet with the tab punch and adhered them to the back on the bottom. The eyes are punched out with 3 graduating circle punches, using white, a color and black.

The bride is made the same way, using the template for the owl and the dress. I used a scallop border punch for the bottom of the dress. I added some bling to the dress collar to resemble a necklace (those are fun to work with!). I also added some large rhinestones to the bottom of the dress for some shimmer. I punched 2 small hearts and adhered them together to make the ear bow and added another rhinestone to cover where I matched them up. I made the eyes the same way as the groom but I added eyelids, sponged with some color to represent eye shadow and cut a small strip of black to make lashes. I really think that the lashes make her!
Be sure to check out Lynn's blog to get the full directions to make her owls. She has many variations that you can make as well!
Thanks for popping in!
Saturday, February 19, 2011
There's a wedding to be planned!!!!
No - not me! It has been 17 years for me and my wonderful hubby! My niece got engaged on Valentine's Day and her fiancee is heading to boot camp for the Air Force in March and when he gets home, we will be having a wedding!! I am so excited for them!
Today I played around with some invite samples for them to look at. Not really sure what they want but I found some cute things while I was surfing Splitcoast stampers website!!! (What a great site!) I know the colors are dark blue and white but I need to know WHAT shade of dark blue she wants!! :) So many choices!
This one I cased and thought it was simple and elegant
. 
I embossed the blue background paper. I am going shopping for a few more embossing folders, as I am having a great time using them with my new Big Shot! I stamped a heart (from the $1 acrylic stamps) with a light blue ink and punched it out  with the large heart punch from Stampin' Up. Not sure if you can see the design on the heart, but it is a fancy swirl.
with the large heart punch from Stampin' Up. Not sure if you can see the design on the heart, but it is a fancy swirl.The next one I made was also cased from Splitcoast.
 I embossed the blue background and ran the butterfly embosslit folder from SU and used the 3 largest on the card. I used dimensionals to raise them up a little. I also punched an oval and a scallop oval and pop dotted them in the upper right hand corner. I figured I could stamp something on the oval.
This last one is by far my favorite.

I knew when I saw it that I had to make one something like it! Once again I used a blue background on a white card. I made a second mat set with the white and blue. I punched the corners with the ticket punch (from SU!) and I used dimensionals on the middle mat set. The "bride and groom" are made from the large heart punch. I punched the white one for the bride and ran it through the Big Shot with the swiss dots embossing folder. I added some crystal bling to the front with glue dots. The groom was made with a white heart and a black heart. I cut the black one to look like a tux front. I added small black self adhesive dots ($1 from AC Moore) to make the buttons. Not sure if you can see it but I spritzed the card with my mixture of shimmer paint and rubbing alcohol to make it sparkly!
If you know of a great site to get ideas for wedding invitations, please share it with me!!! (or if you have made some - please share!)
Thanks for popping in!
Wednesday, February 16, 2011
Happy Humpday!!!
I am so happy that it is Wednesday!!!!! I have one more day of work and then a 4 day weekend!!! Yeah me!!!! But believe me..... today is an IV of coffee day! :)
Today I want to share a 2 page layout I worked on a week or so ago and never got around to posting!
My niece did a photo shoot with Ash (my daughter) a couple of years ago that we use for her official "school" photos. We try and do something each fall to make up for not ordering school pictures. (they are soooo expensive) This year they had a blast just going around and taking pics! Some of the pictures are in black and white and others are sepia.
I wondered how I was going to scrap these but I pulled out one of my handy dandy sketch books and - voila! I had a pattern to use!
 I used some Stampin' Up DSP for background paper and coordinated the mats to match. I love browns and blues together.
I cut the title using my Cricut and the jasmine cart. Love this font.
The brown on the right is cut into small strips for the mat, to add some visual texture.

I know the lighting of the picture isn't the best, but I hope you can see it!
This is the full 2 page spread:
Thanks for popping in today. Please leave me a note and tell me what you think and share what you love to scrap about!
Monday, February 14, 2011
Owl always love you....
Happy Valentine's Day!! Thanks for popping in today! I hope your special someone spoils you rotten today!!! My family got me 2 bouquets of tulips, a crazy alien in a coffee mug (I love coffee) and a new computer game! I love them!
Today I want to share a cute project that I came across in my surfing! I saw it and new I could reproduce it without directions. I hope this doesn't get too long but hang in there - it is so cute and so easy to make!
I recently purc hased a Big Shot die cutting machine and that was the first step. Using the
  pillow box die, I cut one out of red cardstock. Adhere the long side and the bottom end with sticky strip. I really recommend sticky strip as most other adhesives do not hold on a curved surface. (trust me - I have re-taped projects before!)
 hased a Big Shot die cutting machine and that was the first step. Using the
  pillow box die, I cut one out of red cardstock. Adhere the long side and the bottom end with sticky strip. I really recommend sticky strip as most other adhesives do not hold on a curved surface. (trust me - I have re-taped projects before!)
These are the punches that you will be using on this project.
 Using the circle punches, punch the larger one out of white and the smaller one out of black. Depending on what you want for "eyelids" - punch one out of the color of your choice with the larger circle. Cut this circle in half and adhere the black to the white and then add the eyelid.

Using the small heart punch, punch one out of orange for the nose and adhere to the pillow box where the face will be. Cut a small piece of patterned paper to add to the "tummy" of the box. This can be any color to coordinate with the holiday or occasion!


Adhere the eyes to the box with dimensionals, overlapping the heart shaped nose a little. Be sure to remember to add a little white to the eyes for expression!
 Now you can add the wings! Punch out a heart with the large heart punch and cut into half. Adhere to the box with dimensionals at an angle. Punch another small heart or two with the multiple heart punch and adhere to the middle of the wings!!!

Add a couple of Hershey nuggets and seal the top edge closed!

There you go! Believe me - these are so much cuter in real life!! Make some for your friends and family today!!!!!
Thanks for popping in and be sure to eat at least one piece of chocolate today in honor of Valentine's Day!!! :)
Sunday, February 13, 2011
V-day is tomorrow!
Are you ready? Valentine's Day is tomorrow.... This gives you a few more hours to run to the store and grab some yummy chocolates and then to the scrap area to make a card. Hubby's... you too CAN make a card. Your wife would be so surprised and will love you for it! (hint hint)
Today I have a couple of cards that I made for V-day. The first one is for my daughter Ashley.

She loves the Stampin' Up owl punch so I decided to use that on her card. I used some of the Valentine's DSP paper from last year with Stampin' Up. I used a scrap from the back side for the "vest" on the owl. I free cut the tree branch (because I have yet to purchase the bird punch with the branch!) I thought about using some cute googly eyes but I couldn't find them last night! :)
On the inside:
I used a smaller piece of the DSP and added a small white strip to offset it. I dug through my $1 wooden stamps and found the "i love you" stamp. I thought it was a perfect sentiment for this card! I also dug through my $1 acrylic stamps and found an owl set and the "owl always love you" stamp. Everything fell into place for me during my card making time!
For the hubby... I wanted to use a bunch of hearts so I surfed Splitcoast Stampers and found a few that I liked... so I combined a couple and designed this:
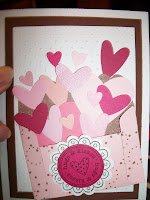 I used a brown background and then ran a piece of white through my {new} Big Shot machine with the swiss dots embossing folder. I found another piece of DSP I that I had cut an envelope with a SU die. I assembled the envelope and adhered it to the card. I used the punch with the 3 hearts to cut a bunch of hearts of different shapes/sizes/colors. I also used the large heart punch to cut 2 larger hearts to adhere inside the envelope. The sentiment I stamped on white and bright pink from the stamp set "Love ya bunches". I punched the white with the scallop circle and then punched the pink center out with the 1 1/4 circle punch. I used a dimensional to raise the center up and adhered it to the envelope. The inside has a small piece of DSP and another stamp that said "will you be my valentine".
 This last one is a quickie that I made a while ago but wanted to share since it is so cute and small enough to tuck into a lunch box. (guess what I am doing with it????!!!!)


I stamped the hearts with red ink and the hearts from the "love ya bunches" stamp set. I cannot remember which set I got the cute raccoon and sentiment from but they are both from Stampin' Up too. The raccoon is stamped on the inside of the card and I punched a circle in the front of the card. To make the red scalloped ring.. I just punched a circle out of red and then used the scalloped circle and centered the circle in it and punched it again. I also punched a full red scallop to put behind the raccoon on the inside!
Well, I hope you have enjoyed today's post. Tomorrow I will be posting a pictorial tutorial on an adorable Valentine's Day treat box!!! Stay tuned!
Thanks for popping in!!!
Thursday, February 3, 2011
The groundhog didn't see his shadow!!
Yeah!!! That means Spring is right around the corner....in approximately 6 weeks~ {sigh}!
Not sure about where you are but we got another foot or more of snow yesterday with another round on the way for Saturday. I know it snows in February in Maine but really???!!!
Today I wanted to share some cute baby shower favors I was asked to make for a friend. I made several prototypes for her to choose from but she made her decision quickly when she saw this!!!

I knew it needed something so I tweeked it a little and came up with this:

These hold 2 Nestle Treasure (yum) chocolates. Is there anything better than chocolate in a favor? (or a bowl,or a cup, etc, etc) I knew that the top needed some more color and I had a hard time finding the baby boy paper I really wanted. It seems like you can find ANYTHING in baby girl but boys... not so much. But.... in perusing the very small scrapbook aisle in Walmart... I found a page kit that had some cute paper so I bought it and cut it up!!! :) Some have these cute elephants on it, others have snails and some are just stripes!
On the mailbox flap I stamped "it's a boy" and made the flag out of a scrap piece of the leftover brown and used my heart punch from Stampin' Up for the top. I was going to use a small red heart in the middle but was afraid it would make it too "valentine-y"so I left it alone. But these would make great little Valentines for your kids school parties (or just to have)! I ended up making 60 of these little creatures! Once I got the production line going - it went pretty smoothly.
On the home front...a couple of weeks ago my daughter signed up to take a cooking class. She was a little nervous about it but had a ball! It turned out to be just her and another friend taking the class this time.

They made a wonderful breakfast (which she has made since then) and learned a lot. now she is starting to help me more and more in the kitchen!
Thanks for popping in today! If you have any ideas that you would like to share with me - leave me a comment!!! :)
Wednesday, January 26, 2011
Happy Hump day
Happy Wednesday! We are halfway to the weekend!!! Yeah!! Not sure about where you are but here in Maine it is lightly snowing - with no accumulation - and cold! I don't really mind winter but I hate being cold. There is only so many layers you can put on before you become the stay puff marshmallow man. :)
Today - I am going to share a few more pictures from the album I made for my mom-in-law for Christmas. This was a 60 minute scrapbook kit and it was fast and fun!


All the pieces came with the kit so I had to add NOTHING!!! It was great! Some of the layout designs I rotated or positioned things differently but it was all inclusive scrapping! Doesn't get much easier than that!
I have to remember to get some pics off my laptop at home to share with you this week!
Thanks for popping in!
Tuesday, January 18, 2011
Happy New Year????
Boy time flies!!! Last time I was here it was still December. Now it is halfway through January. Wow!!! I hope you all survived New Year's. It was pretty uneventful in our house!
We have had 1 major snowstorm already in 2011 and it is snowing hard as I type, with another storm on the way for Friday. Looks like Maine will actually have a winter this year!
Well, amidst all my hustle and bustle.... I have actually been doing something scrap related!

First I want to share the pictures of my new scrap area. I am still tweeking things but if you remember my before pictures - this is a much needed improvement!! Here ya go:

Well, what do you think? Drop me a note and let me know!
And - believe it or not ..... I have scrapped 2 - 2page layouts!! Wowwie!!!
I will share one today and the other later this week!
This one is the first day my daughter attended a gymnastics class. Take a peek:


For supplies - I used plain dark blue cs and the patterned paper is one that had gymnastics written all over it on one side and words relating to gym on the other (sorry cannot remember the brand). I also had some neat gym stickers that I used as accents. On the right hand layout - I added my journaling under the bottom right picture with a slider piece. I found this layout idea in one of my many sketch books!
Thanks for popping in today and with luck - I will be back later this week with another post!!!
Subscribe to:
Comments (Atom)
